Dockerized Pi-Hole container without -net=host

Pi-hole is a black hole for internet ads and advertising spyware. It works at the network level by filtering your ISP's DNS server. Essentially when a computer on your private (usually a home) network makes a request for the IP address of a web site, Pi-hole will capture that and compare it to a black list. If it determines that an advertising spyware site was requested it substitutes its own address in and shows a blocker page. Users never see these pages, however, because they are mostly hidden spyware craftily designed to not be seen.
The latest version 5.8.1 is a drop in replacment for 5.2.1 which was a drop in replacment for v5.1.2 (which looks like a typo - lol) which was a dropin replacement for v5-beta. V5-beta operated for months as did V4.4 before it. Literally not a single hitch!
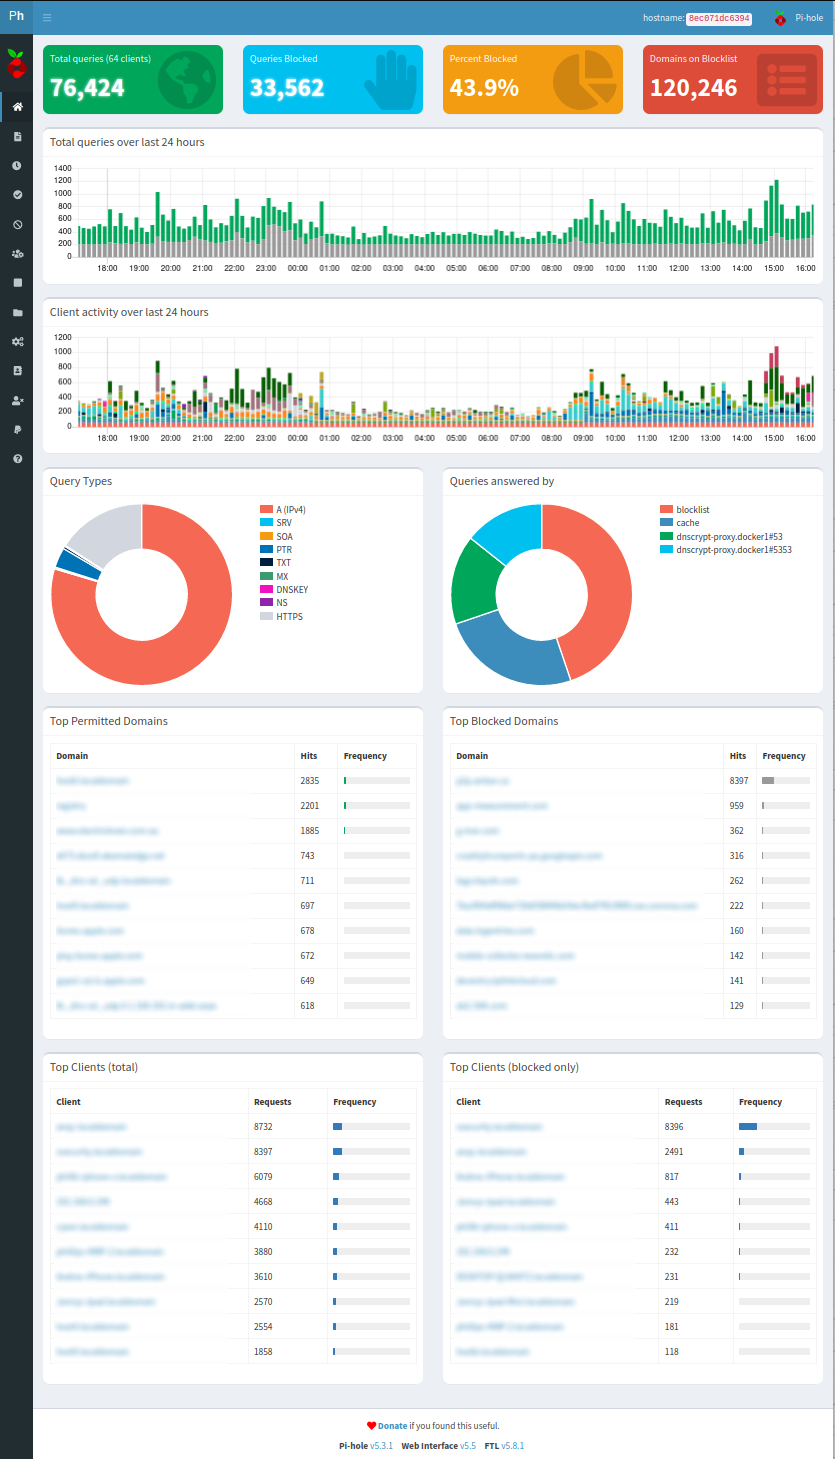
V5.8.1 UI
DNSSEC - Stop ISP/RSP/Governments hacking your DNS
Settings and adjustments for PiHole and DNSCrypt that help prevent dodgy IP addresses coming your way for https sites. This makes it even harder to perform man-in-the-middle attacks where your browser is fed the wrong IP address for a secure web site, like a bank or a news outlet. Often a browser checks a secure SSL certificate website name but sometimes the certificate might not have the server's IP address in it (which is pretty common for LetsEncrypt certificates). DNSSEC checks the address you have been given is correct.
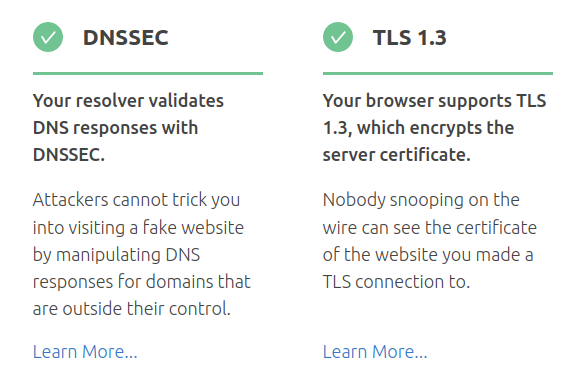
DNSSEC validation testing
The details for these settings will be moved over to a new page (soon....). And if you're wondering, yes, it does find stuff.
Running the PiHole Docker Container
Quick notes on Pi-Hole in a docker container. This thing is so good, I actually subscribed and gave them real money!
1) Download and run the container with a pull command.
a) docker pull pihole/pihole:4.1_armhf 4.3.1-3_aarch64 v4.4 beta-v5.0
b) the "docker run" command shown has a couple of differences to the official documentation.
Essentially the ports needed for DHCP can't work as documentated as far as I can work out. (This is now documented on the PiHole website - fantastic work by the PiHole peeps - they even provide a further even better option albeit somewhat techie) From what I can understand, the clients broadcast a request on a network segment to get an IP address from the DHCP server. Unfortunately the docker containers are all, in effect, on a different segment to the host's physical interfaces. i.e. they will never hear the broadcast requests.
This is why many people resort to using the --net=host setting. When this docker option is activated the container is directly connected to the host's IP stack. The downside of doing that is it cuts-off the possibility of other containers using those ports, which is not good in a router/filewall. The configuration here will allow for running other container's like a VPN client, a http VPN proxy server, a VPN server etc concurrently on the same pi.
See below for a cure to the broadcast issue. For now, however, note that the container's port 67 is not "published" so as to free it up.
Reference - PiHole now has a basic page on DHCP here: https://docs.pi-hole.net/docker/DHCP/
note: computers on the local LAN have been named so as to add them to the container's internal /etc/hosts file via docker's startup mechanism. In --net=host scenario docker will simply copy the entire host's /etc/hosts file in to the container and use that. Hence the requirement for --add-host entries.
update (March 2019): --add-hosts entries have been removed. Use --volume /etc/hosts:/etc/hosts:ro to map in the localserver's /etc/hosts file in to the container. Note however that the hosts file becomes read-only in the container (no problems noted with this).
note: Port 53 tcp is problematic if you intend to use dnscrypt. See the dnscrypt page for details.
#!/bin/bash

docker run -d \

   -e       ServerIP="192.168.0.254" \

   -e       ServerIPv6="" \

   -p       192.168.0.254:53:53/tcp \

   -p       192.168.0.254:53:53/udp \

   -p       192.168.0.254:80:80 \

   -p       192.168.0.254:443:443 \
   -v       /etc/hosts:/etc/hosts:ro \

   -v       /docker/pihole/data/pihole/:/etc/pihole/ \

   -v       /docker/pihole/data/dnsmasq.d/:/etc/dnsmasq.d/ \

  --name    pihole \

  --restart unless-stopped \

  --cap-add NET_ADMIN \

  --dns     127.0.0.1 \

  --dns     1.1.1.1 \

  docker.io/pihole/pihole:latest

# --net=host \
2) Enable the DHCP server in docker container's Pi-Hole settings
3) Install dhcrelay on the host with "dnf install dhcp-relay". Note: all pi machines here use Fedora (Update: changed to Ubuntu) so RPMs should exist on Centos, RHEL, and derivates.
4) It is essential to use the ID and IU interface specifications in the dhcrelay setup. This tells dhcrelay to listen for broadcasts on one interface and relay to another:
a) cp -a /lib/systemd/system/dhcrelay.service /etc/systemd/system/
b) vi /etc/systemd/system/dhcrelay.service
c) ExecStart=/usr/sbin/dhcrelay -d --no-pid -id eth0 -iu docker0 172.17.0.2
5) Change the dnsmasq options to include:
a) dhcp-option=option:dns-server,192.168.0.254
without this pihole adds the container's address (172.17.0.2) to dhcp's DNS server list ahead of the host's address. This is bad since nobody on the LAN can access 172.17.0.2 and so causes clients to timeout before using PiHole's LAN DNS address (which is the host's interface - 192.168.0.254 in this case).
System diagram
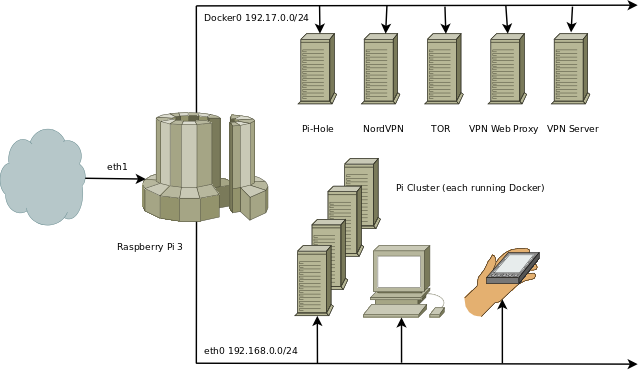
Computers on the Docker0 network are docker container "Machine Images", while computers on eth0 are actual machines (most of the Pi's are also running docker with yet more containers). Eth1 is a USB ethernet adaptor which provides the router/firewall hardware support.
Testing (from the Fedora desktop machine):
1) To release the lease address use: dhclient -v -r eno1
2) To renew a lease use: dhclient -v eno1
3) cat /etc/resolv.conf
* Force all DNS via Pi Hole: https://dxpetti.com/blog/2019/using-iptables-to-force-all-dns-queries-to-a-pi-hole/